🔙 An introduction to the container world with Docker
This is a repost from my 2017 article on medium. Although today Docker is substantially more known topic as it was before I think it might be good to let the basic knowledge I shared in this post accessible in the dev.to platform as well. I took the opportunity to update the post and refine it though. So if you are new to it, come along and enjoy =)
An introduction to the container world with Docker
What will I achieve? By the end of this article, you will understand the core concepts of Docker, such as images, containers, Dockerfiles, using it along with useful docker commands. And comprehend why it is good for production and development and will be able to run your applications using Dockerfile and Docker Compose.
At this time you probably heard someone talking or read some article that cites Docker. But what is it all about? Why should I use Docker? And why is it good for both dev and production systems.
Why use containers?
Imagine yourself having two different services (1 and 2) running in the same host machine at AWS, they have the same technology dependency, both is running under the framework v2. Right now you have to upgrade the service 1 to the new version framework v3, because it integrates with the monetization platform of your company.
So you have to enter inside your machine running at AWS using command line tools and now you update the framework! Unfortunately the service 2 is not compatible with this new version and everything starts breaking! You can rent another machine on AWS, enter in it, copy all the files of service 2 and install the older version of the framework, now it is running fine.
However, is this mean time the team had another version of the service 2 and you just installed the older one because you have copied the wrong code base! The process starts over again! Isn't it getting boring?
When it comes to provisioning machines and configuring dependencies to run some application there are some options. Tools such as X allows you to write infrastructure as a code and automatically configure and deploy machines and related. We can go beyond that though.
Using cloud services or not hosting, delivering and running services add some relevant concerns like:
- How do I guarantee a stable environment for my application?
- How do I manage the environment configuration of my application?
- How do I scale and upgrade my service efficiently?
- How to isolate my service dependencies from the others?
Containers
Containers are not a new concept, used since early 30's to the actual patent in 1956 by Malcom McLean. The need of shipping different packages of products with different constraints (size, dimension, weight…) came to the standardization of a shipping model called container.
Metaphors aside, in the software production world we find the same needs. And here comes the Software Container, something that bundles the software product and manages its configuration for shipping.
Docker
Software Container is not a new concept too, but working on it is a hard low-level job for most of the engineers. Docker, however, turns out being a fast, easy to use, and powerful tool for containerization of your software.
Using Docker you define images which are descriptions of a software environment settings and commands. And from those images, you can run containers which are the actual executable bundle.
How does the docker work?
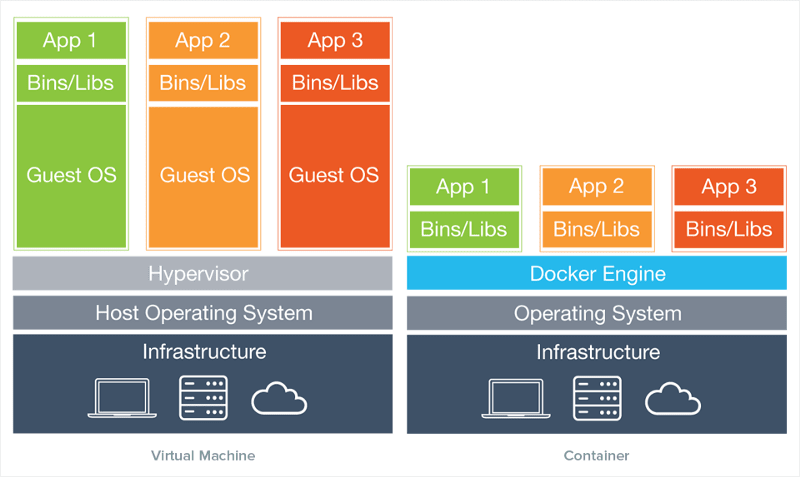
Docker runs under the host system kernel, the containers contains only user space files and all resources, configuration needed, libs, dependencies and executable commands are defined through images which are light and easily adaptable for different purposes.
Differently from VM's, Docker does not emulate the entire OS on the host machine and that is why is so light compared to VM. The Docker Engine works like a middleware managing the containers process along the host OS. The containers with Docker only loads the necessary bins/libs (and the app obviously 😛) for your App to run.
The goods come are notorius when you start using.
- Resource efficiency: You are able to configure disk space, memory usage, libs and bins to load of your container. Being able to create the lightest and efficient environment for your app.
- Compatible: Compatible with Linux, Windows and MacOS distributions.
- Easy to run and fast: Easy installation, command line tools use and optimizations of the building and run containers.
- Software maintenance: Release new versions changing the containers and guaranteeing the right environment.
- Scalability: Scale your service replicating containers as long as your traffic is heavy and turn some down when it is not so bothered.
- Security: The containers are isolated from the host machine, so it can't access anything outside its own boundaries.
- Reproducibility: The containers are a well defined environment and you can guarantee the same infrastructure over a set of definitions.
Hands on! 🙌🏽
Let's try out using Docker now! Installation: On Install Docker you will find the instructions for your correct system. There are dist for Mac, Windows and Linux dists.
Once you have the docker installed and running on your machine jump to your terminal and hit docker -v for checking your docker version. Now try run the following:
$ docker run -it alpine sh
This command says to docker run in interactive mode, -it flag, the Linux Alpine and runs the sh command. So as you probably does not have the alpine image on your machine the Docker will download it before running.
If everything went well you should be on the sh shell mode of the alpine. That’s right, you are on a terminal of a Linux running inside a container in just a few seconds! Try ls for checking the files and folders.
Now type exit and you are done. You will exit and stop the container.
Note: The Docker was built for Linux and it's now native for Windows too. However, on Mac, it still has to run a VM in the background for emulating the host. It is still much lighter than using VM's for all the job.
Images
You might asked yourself on how does the Docker know about alpine and where did he get it from. The alpine comes from this repository on DockerHub. DockerHub which is a repository of container images. Users and organizations can publish their official docker image of their [software, language, system, OS, …].
DockerHub is the GitHub of containers. You can pull some image for starting a containers like you pull some code on GitHub to run. The daemon looks for the image in the host machine, if he does not find it then he looks for the image on the DockerHub.
Using a Dockerfile you can start from a very basic image definition and create layers over it, describing the next steps of the image execution. Doing that, you can be incremented and adapted to your needs.
Dockerfile
Clone the following code for ease the next steps. Download here. There are two folders holding two different applications one called node-service and the other is webapp. Let's start with webapp, create a new file called Dockerfile at the webapp folder.
I recommend the reading of the documentation for more details.
The first thing we set on a Dockerfile is the starter image from our app. In this case, the webapp is a React application so an environment with Node.js installed is fine for us. Thankfully there is an image on DockerHub for that.
FROM node:6.3.1
This command says that from the starting image node:6.3.1 do the rest. This image contains the Node.js version 6.3.1 installed under a Linux distribution. Let's continue writing down others commands:
FROM node:6.3.1

# Run a command for creating the following path on container
RUN mkdir -p /usr/web-app

# Sets the work directory of our app to be the new path
WORKDIR /usr/web-app

# Copy all files from current directory to the new path in container
COPY . /usr/web-app

# Run the command for installing our node dependencies
RUN npm install

# Define the command that will execute when the container start
CMD npm start
Now that we have our file set. Let's run the application inside the container.
$ cd webapp
$ docker build -t web-app .
It might take some time to download the image of Node Running the build builds the image based on the Dockerfile present on current (.) directory. The -t is a flag for tagging this image and name it web-app.
$ docker images
Your web-app image should be listed. Now let's run our app!
$ docker run -d --name web-app-container -p 3000:3000 web-app
The docker run your container in a no interactive mode by the flag d, it then names your container with --name web-app-container, and also maps the port using -p (format is port-on-your-machine:port-on-the-container). And use our image named web-app for that. Try to go for your browser on http://localhost:3000.
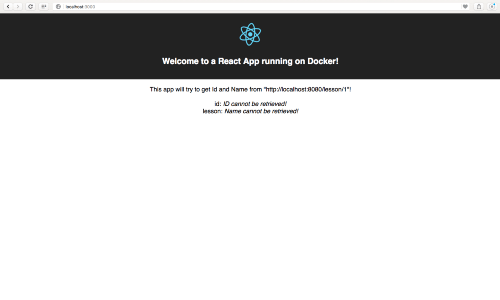
The React app is running inside the container on localhost:3000. This port on the container is mapped to our host machine so we can access the application.
The webapp dependes on some data from the node-service so as you can see an error message is displayed on the place for id and name❗️
$ docker ps
The command above lists all the containers that are running at the moment, try -a for display all containers created. Now we can see that it's really running if you aren't sure yet try to stop the container and reload the browser!
$ docker stop <container-id-listed-on-ps>
Let's move to and start the node-service application. Go to its root folder and create a new Dockerfile for this service. As it is a node application it will be pretty much the same.
FROM node:6.3.1

RUN mkdir -p /usr/node-service

WORKDIR /usr/node-service

COPY . /usr/node-service

RUN npm install

CMD npm start
Let's build and run the node-service container, then reload the webapp!
$ cd ../node-service
$ docker build -t node-service .
$ docker run -d --name node-service-container -p 8080:8080 node-service
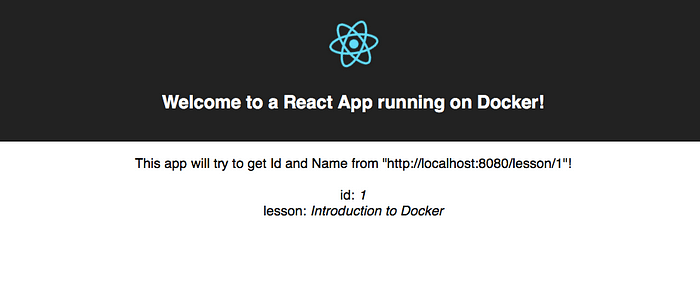
Perfect! Your containers are now running and talking to each other! ✅
If for any reason you need to delete an image or a container built use:
- Images use
$ docker rmi <containerID> - Containers use
$ docker rm <containerID>
It might be useful to run your container in interactive mode to debugging or doing work on the container environment, in this case use -it flag on docker run.
However, if you want to enter in the container on bash, for example, and your container is already running go for:
$ docker exec -it <containerID> bash
You can try all these commands above in the container we just created.
⭐️ Now you know a little bit of containers using Docker and already ran it for real! That's great! There are only a few more topics that I want to go through.
Right now I recommend you to take a cup of coffee ☕️ and relax before continuing.
Docker Compose
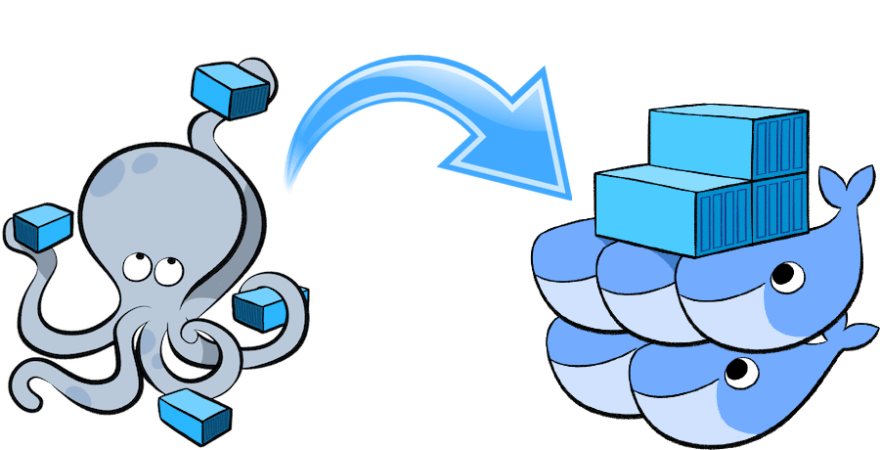
Docker Compose is a tool that came installed along Docker and is useful on the orchestration of different containers. The point is to let your Composer manage the build and the run all of yours projects.
Container orchestration is the next level for managing our services lifecyles. We are able to manage and control enumerous things like: Load balancing, Redundancy, Resources allocation, Scale up and down the instances, etc.
The Docker compose is the defualt format to use along Docker Swarm orchestrator.
However, we are able to try it in our project that we just made! We just have to create the docker-compose.yml file!
Access the root folder intro-docker-examples of your project and create the docker-compose.yml file. Let's now configure it properly.
In this file, you have to define our apps under the services property. We are going to define first the webapp.
version: "2"
services:
  webapp:
    build: ./webapp
    ports:
      - "3000:3000"
    depends_on:
      - node-service
We defined above the webapp service with the build instruction for build the project folder (it will look for our Dockerfile), the map of the ports as well as we did early in the commands and we are saying that for this service to run it depends on the node-service so the docker compose will run the node-service first for guarantee this dependency.
version: "2"
services:
  node-service:
    build: ./node-service
    ports:
      - "8080:8080"
  webapp:
    build: ./webapp
    ports:
      - "3000:3000"
    depends_on:
      - node-service
So we defined now the node-service as we did for webapp. The version defines the type of the docker compose configuration and this template is related to version 2!
Stop now the older containers if they are still running and remove them using the commands I showed you before. And now we could see the Docker Compose building everything again. From the command line on the root folder go for:
$ docker-compose up
This will create new images for your projects, build the containers and run them on an interactive view. You will now see the logs from the services.
Access the http://localhost:3000 and check now that everyhing is working fine!
For stopping the containers go to another tab on your terminal, navigate to the folder and run the command below. It will stop each container in order.
$ docker-compose down
That's great! Everything working fine, but what does will happen if I have to change my Dockerfiles definitions? If you are using the docker-compose then simply run:
$ docker-compose up --build
In case you made editions to your Dockerfile you can use the flag -- build` to force rebuild the images and containers. The rebuild of any docker container uses cached steps for optimizations. That means the docker only rebuilds the steps from the step changed to the final.
The final files of this implementation are available here.
Docker beyond production
Using Docker for production deployment is a reality and has a lot of benefits. However, using Docker under the development environment is also a good practice.
Defining the configuration and dependencies of your project on a Dockerfile sets correctly the environment to anyone who is going to work on your project! This avoid issues dependencies related to host and libs versions and allow your the host machine environment to stay clean.
For example, you can spin up a local database such as postgres or mongodb in a container and make your application locally connect to it instead of having this installed in your computer.
A good tip for devs is look for volumes. This creates a channel that enables synchronization between a folder inside the container and the host machine. So if you write your code on the host machine it will be synced to the code in the container.
Some languages and applications, like in webapps, have the capable of hot reload. So as long as you code from your host machine you can see the changes being compiled and ran into the container. But if your technology does not have this function you can open a terminal tab to enter in the container and recompile/run the project as well.
You can also use Docker in your CI/CD pipelines building docker images to run test over and publishing them if it is healthy.
The end?
Actually it is the beginning of our journey using Docker! There a lot to learn and practice! Look forward more topics and concepts of Docker.
As Kubernetes became really popular, is the most popular container orchestrator in the block. The next step for you is definetly explore the endeavors related with container orchertration!
If this article helped you somehow please leave your appreciation ❤, if it did not fulfill your expectations please send your feedback ✉️ and always share your thoughts in the comment section below 📃!
See you next time =]
Let me know what you think about this post on twitter!


